QEMU 支持直接启动具有 Linux Boot Protocal Head 的 kernel 文件,而 FVP 在启动这类 kernel 文件时,就需要借助 ATF 与 u-boot,启动流程较为复杂,而且对调试很不友好。但是 FVP 支持直接启动 ELF 文件,这就需要 boot-wrapper-aarch64 将具有 Linux Boot Protocal Head 的 kernel 文件封装成 ELF 文件,以便 FVP 直接启动 kernel。封装前 kernel 发出的 PSCI 请求由 ATF 响应,封装后由 boot-wrapper-aarch64 响应。
boot-wrapper-aarch64 在处理多核启动时没有 ATF 那么灵活(详见ARM Fixed Virtual Platforms (FVPs) + boot-wrapper-aarch64 多核启动),只支持系统 startup 时所有核心一起上电,所以需要对 FVP 添加配置 -C pctl.startup=0.0.0.* 确保每个核心都上电。
如果不是所有核心都上电,在初始化阶段会卡在这里:
| |
CPU 亲和性、MPIDR_EL1 寄存器与设备树 cpu 节点的 reg 值
要想搞懂 FVP 核心启动的四元组配置,首先需要搞懂 CPU 亲和性的相关信息。
默认状态下,FVP 中 cpu 亲和性四元组中每个数字含义如下:
- 第一位(chip): 物理 SoC 芯片 ID(通常在单 SoC 系统中是 0)。
- 第二位(cluster): 处理器簇(Cluster)ID,用于标识属于哪一组 CPU 核。
- 第三位(core): 在某个 Cluster 内的 CPU 核 ID。
- 第四位(thread): 超线程 ID(如果处理器支持 SMT,则会有多个线程)。
这四位与 MPIDR_EL1 寄存器(armv8 是 MPIDR_EL1,armv7 是 MPIDR)中 Aff0、Aff1、Aff2、Aff3 值相对应。

Aff 0、1、2、3 在四元组中对应关系为 {Aff3, Aff2, Aff1, Aff0},每个四元组唯一标识一个 CPU。
同样,设备树 cpu 节点中的 reg 值就是从 MPIDR 寄存器中计算得到的,计算方法如下:
以 ArmV8 64bit 系统为例:
- 当
#address-cellproperty 为 2 时,需要设置 MPIDR_EL1[39:32](Aff3)到第一个 reg cell 的 reg[7:0]、MPIDR_EL1[23:0](Aff2、Aff1、Aff0)到第二个 reg cell 的 reg[23:0]。 - 当
#address-cellproperty 为 1 时,需要设置 MPIDR_EL1[23:0](Aff2、Aff1、Aff0)到 reg[23:0];reg 的其他位设置为 0。
对于 MPIDR_EL1 中的 aff0/1/2/3,对应 FVP 四元组为 (aff3, aff2, aff1, aff0),reg 值为 <0x aff3> <0x aff2 aff1 aff0>。
计算示例(示例中 aff3 均为 0,#address-cell property 为 1):
- FVP 中亲和性配置为:
pctl.CPU-affinities=0.0.0.0, 0.0.1.0, 0.0.2.0, 0.0.3.0,那么 reg 的值应该是:- cpu0: 0x00 00 00 00
- cpu1: 0x00 00 01 00
- cpu2: 0x00 00 02 00
- cpu3: 0x00 00 03 00
- FVP 中亲和性配置为:
pctl.CPU-affinities=0.0.0.0, 0.0.0.1, 0.0.1.0, 0.0.1.1, 0.0.1.2, 0.0.1.3,那么 reg 的值应该是:- cpu0: 0x00 00 00 00
- cpu1: 0x00 00 00 01
- cpu2: 0x00 00 01 00
- cpu3: 0x00 00 01 01
- cpu4: 0x00 00 01 02
- cpu5: 0x00 00 01 03
Note:0.0.1.3 对应的是 0x103,而不是 0x13,因为 aff0、1、2、3 每个占用 8 bit 空间。
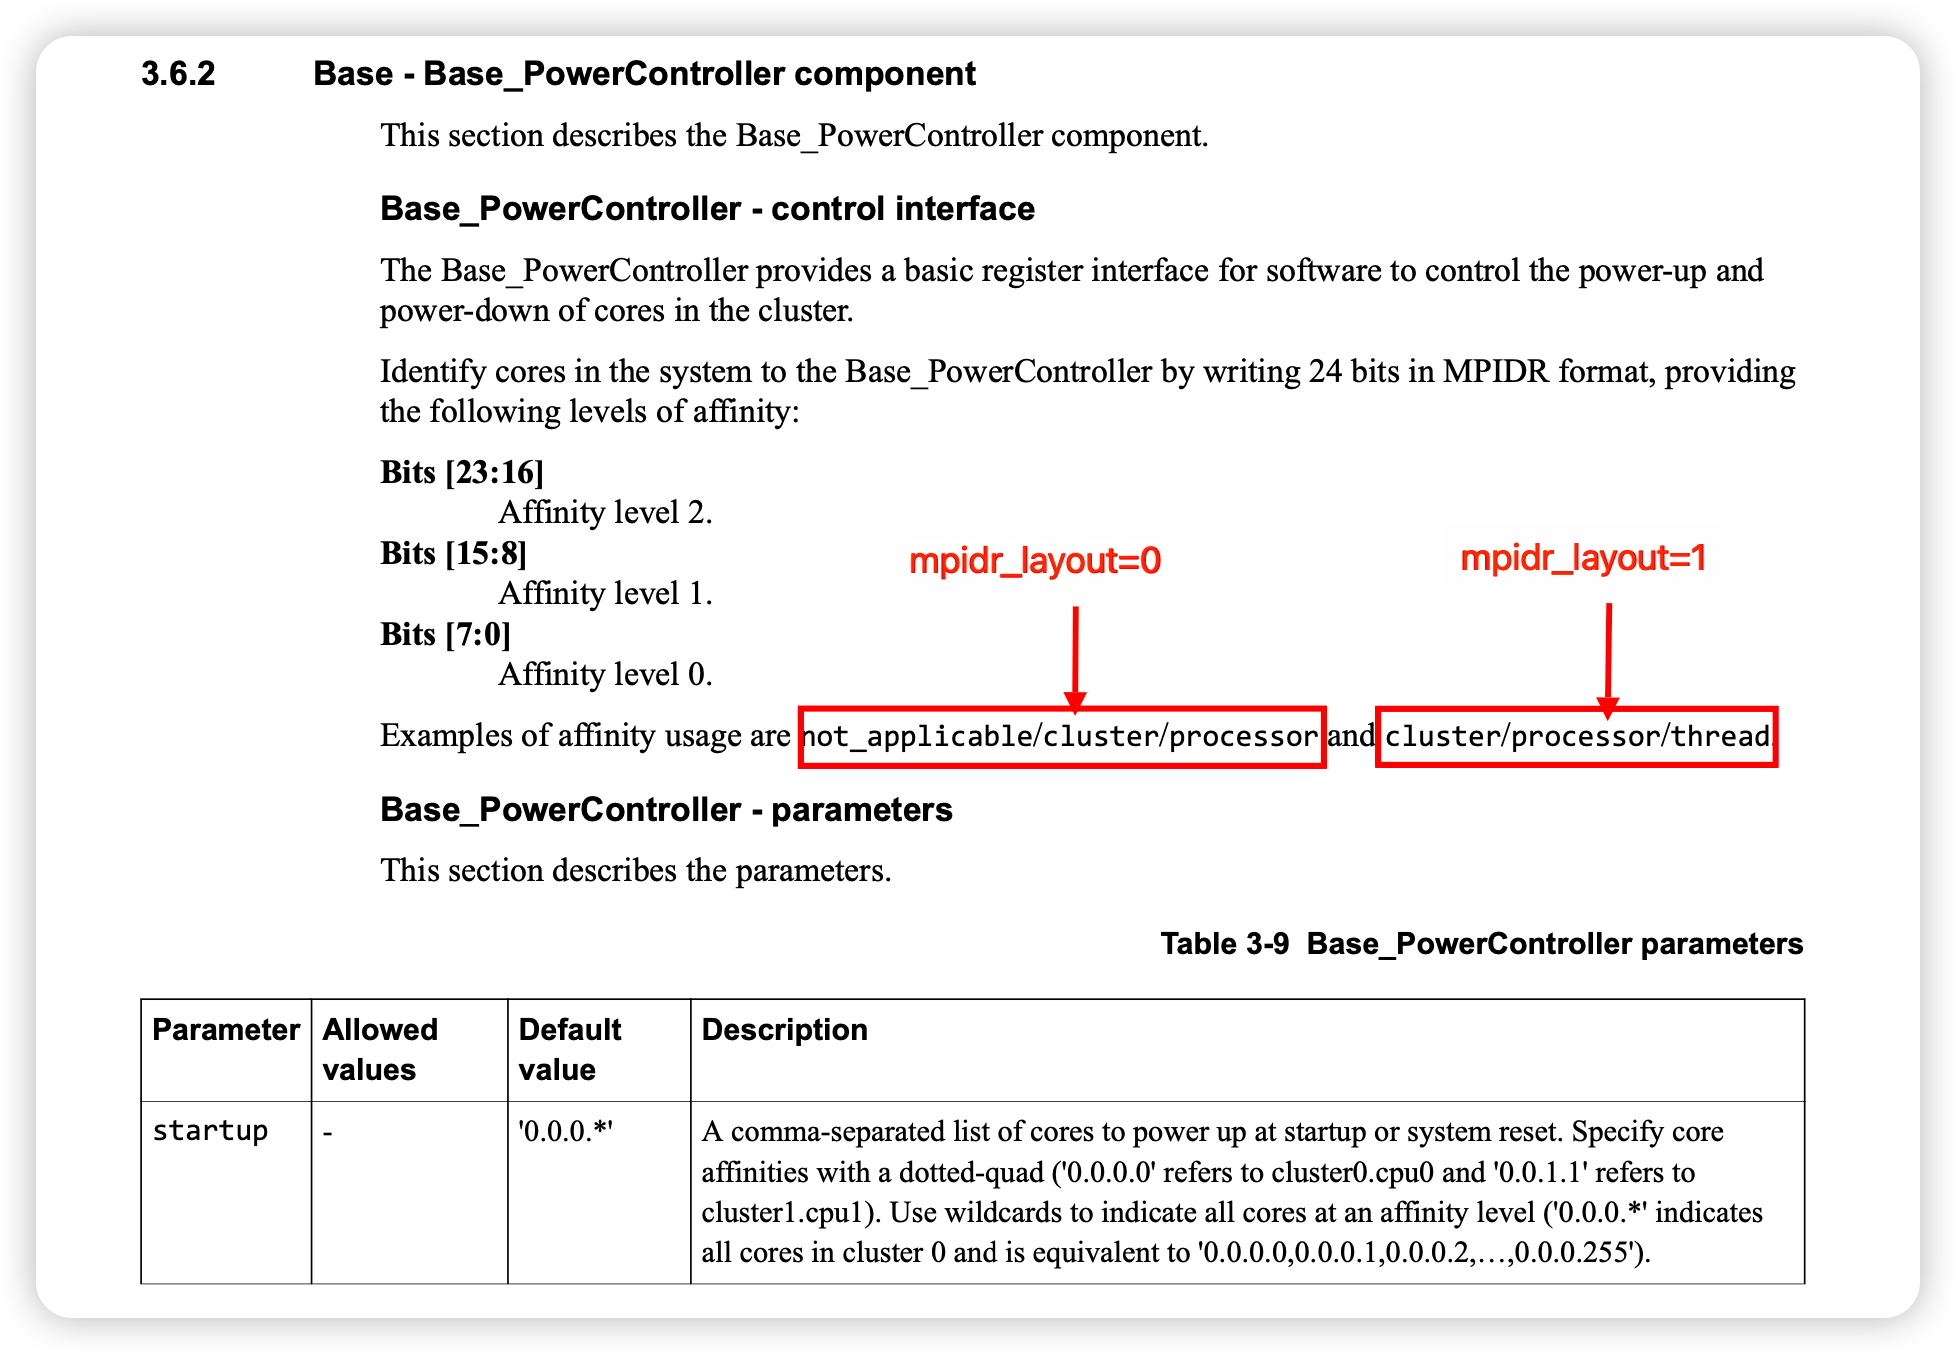
FVP 中 CPU 亲和性相关启动参数
-C cluster0.mpidr_layout=0mpidr_layout=0 时,AFF0 为 CPUID,mpidr_layout=1 时,AFF1 为 CPUID。将 mpidr_layout 设置为 0,使得四元组倒数第二位代表 cluster 号,最后一位代表 cluster 内 cpu id,方便计算,FVP 手册中也对 aff 含义进行了描述:
-C pctl.CPU-affinities='0.0.0.0, 0.0.0.1, 0.0.0.2, 0.0.0.3'配置 CPU-affinities,修改默认的 cpu 亲和性,配置 cluster0.mpidr_layout=0 时,计算得到的设备树中 cpu 节点的 reg 值为 0x0 0x1 0x2 0x3,较为直观。
-C pctl.startup=0.0.0.*使用通配符,为确保亲和性为 0.0.0.0, 0.0.0.1, 0.0.0.2, 0.0.0.3 的四个核心在系统启动时全部上电。
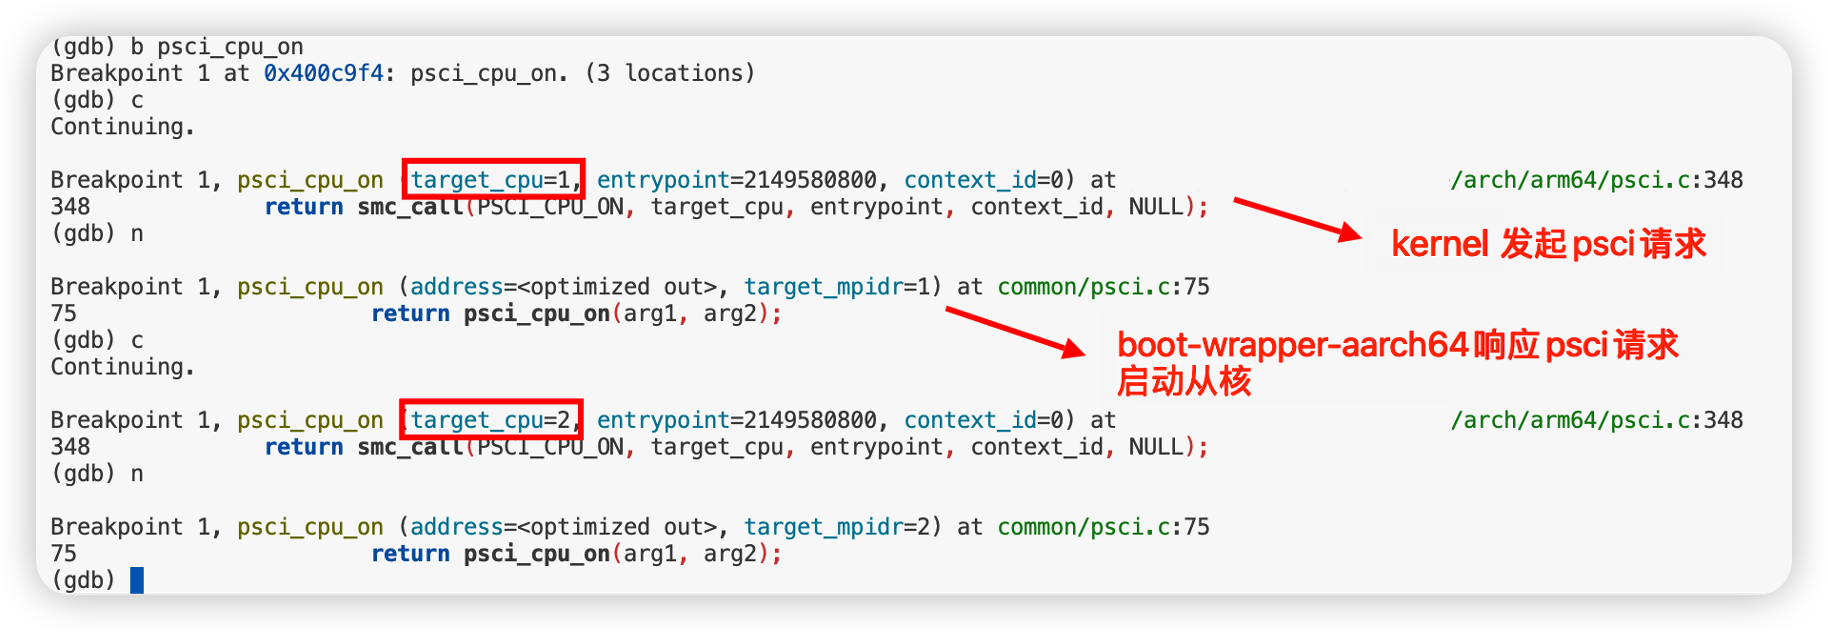
虽然在启动时所有核心都会上电,但只有主核心(primary CPU)会从内核继续执行,其他辅助核心(secondary CPU)则会自旋等待,mailbox 中存入从核的启动地址(即内核的启动地址),此时从核才会启动。
1 2 3 4 5 6 7 8 9 10 11 12 13 14 15 16 17 18 19 20 21 22 23 24 25 26 27// wrapper-src/common/boot.c /** * Primary CPU finishes platform initialisation and jumps to the kernel. * Secondaries are parked, waiting for their mbox to contain a valid address. * * @cpu: logical CPU number * @mbox: location to watch * @invalid: value of an invalid address, 0 or -1 depending on the boot method */ void __noreturn first_spin(unsigned int cpu, unsigned long *mbox, unsigned long invalid) { if (cpu == 0) { unsigned long addr = (unsigned long)&entrypoint; #ifdef KERNEL_32 jump_kernel(addr, 0, ~0, (unsigned long)&dtb, 0); #else jump_kernel(addr, (unsigned long)&dtb, 0, 0, 0); #endif } else { *mbox = invalid; spin(mbox, invalid); } unreachable(); }在 kernel 代码中,主核通过 psci 启动从核(调用函数的参数为 cpu ID 和 kernel entrypoint),boot-wrapper-aarch64 的 psci_cpu_on 函数响应 psci 请求,并将 entry point 存入对应 cpu 的 mailbox 中:
-C bp.refcounter.non_arch_start_at_default=1这个参数控制 FVP 处理器核内 generic timer 是否使能,默认是不使能的,如果 generic timer 未打开,Linux 系统就无法正常工作。(现象是进程切换不成功,应该是 generic 无法工作导致中断无法产生),在使用 boot-wrapper-aarch64 启动时,它不会主动启用 generic timer。
如果使用 ATF 作为 boot loader,则无需设置此参数,因为 ATF 会在平台初始化时自动启用 generic timer:

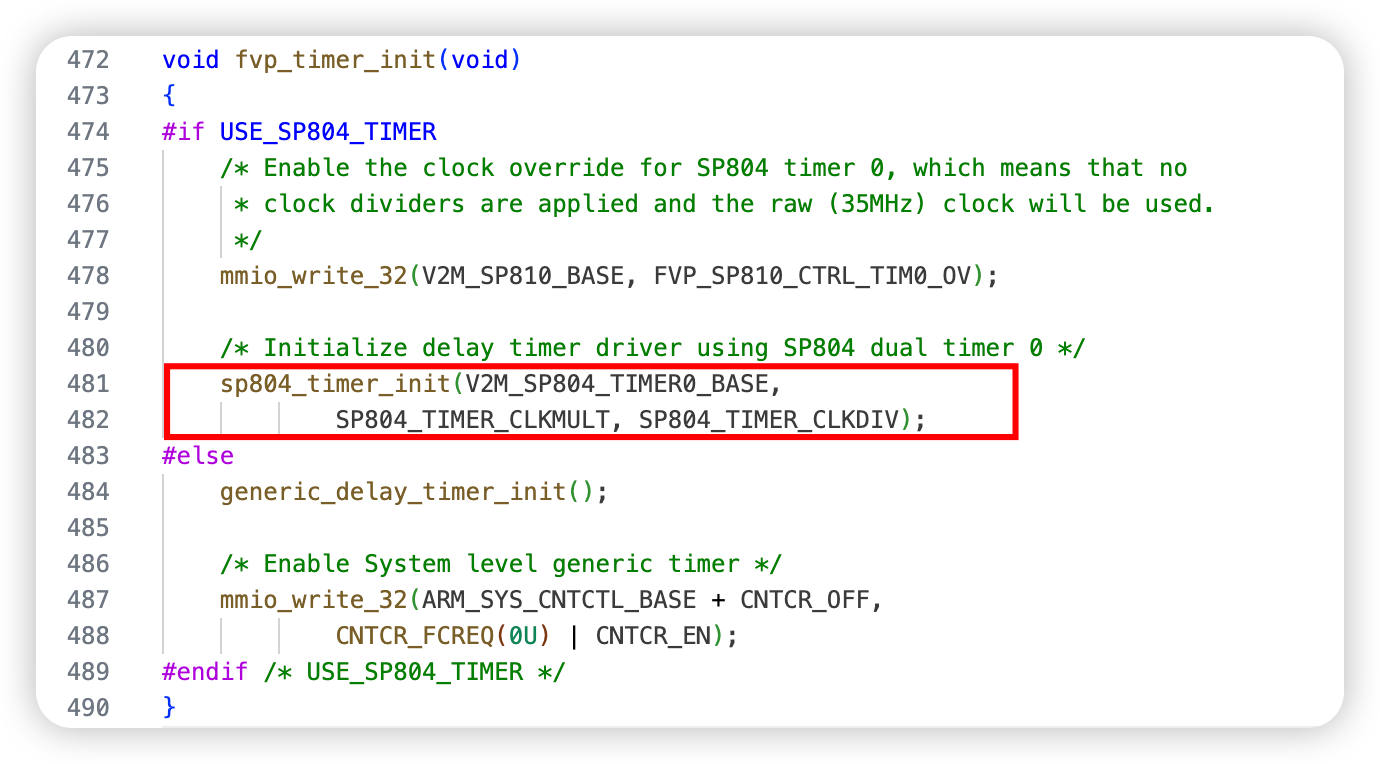
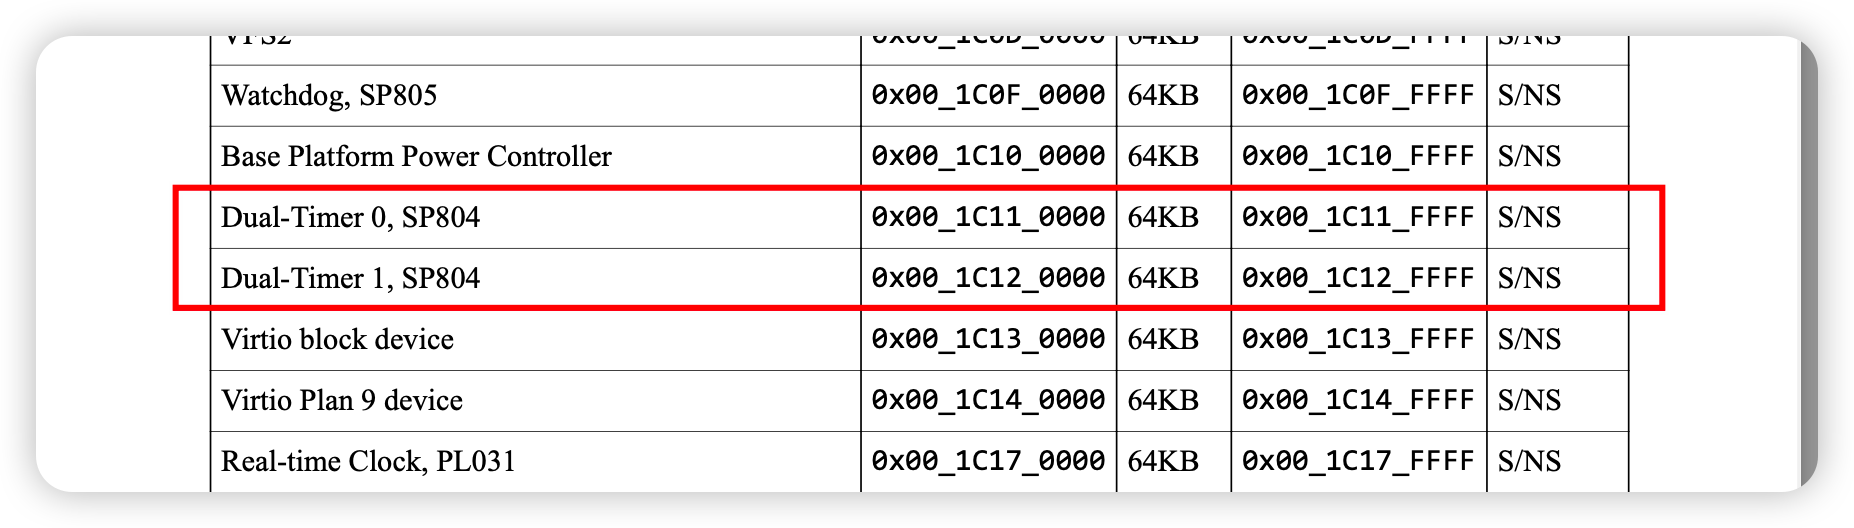
FVP 手册中 timer 的描述:
-a cluster0.cpu*=$(path/to/linux-system.axf)这个参数用来指定 FVP 运行的 ELF 文件,星号用于将簇内所有 cpu 的 entry point 改为 ELF 文件的 entry point
boot-wrapper-aarch64 使用教程
boot-wrapper-aarch64 的使用较为简单,只需要指定一个带有 Linux Boot Protocal Head 的 kernel 路径和该 kernel dtb 的路径即可。编译产物就是 ELF 格式的 linux-system.axf,示例如下:
| |
总结
本文介绍了如何在 ARM Fixed Virtual Platforms (FVPs) 上使用 boot-wrapper-aarch64 实现多核启动。通过将具有 Linux Boot Protocal Head 的 kernel 文件封装成 ELF 文件,可以简化启动流程并提高调试效率。我们详细讨论了 CPU 亲和性、MPIDR_EL1 寄存器与设备树 cpu 节点的 reg 值的关系,以及 FVP 中相关启动参数的配置。最后,提供了 boot-wrapper-aarch64 的使用教程,帮助读者快速上手。